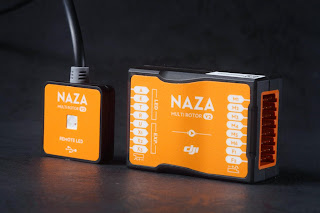
Just wanted to share some info on this newly released flight controller from Rctimer. It is actually a clone of DJI naza, it seems they reverse engineered the Naza, changed a few things to avoid lawsuits and named it Atlas, they weren´t even bothered to change the colour, I guess this is probably to let the consumers know that it is a clone of the popular Naza at the fraction of the price.
Both controller share many of the same features, the atlas has IOC (intelligent orientation control or headless mode, RTL (return to launch mode), altitude hold mode, stabilize mode.
Installation of this flight controller took less than 15 minutes, the only soldering i had to do was to connect a XT60 connector for a lipo battery, the rest was very simple. The GPS and the LED fit into two connectors clearly marked, the one side of the board has 8 motor connectors and a Power input VIN that comes from the LED. The opposite side has connectors for your reciever. There are three extra channels, the first channel controls the stabilize, altitude and GPS mode. The second controls the RTL, IOC and Off. the third channel is not currently used.
The GPS can be angled at about 45 degrees
The LED displays which mode, you are currently flying in, by using a blue, green blinking sequence. It can also display how strong your GPS signal is using a red sequence. One of the cons in my opinion is the red sequence, the red is also used for battery voltage warning. When the battery is about 50 %, the battery warning is constantly blinking, thus suppressing the blue and green sequence. The battery LED blinked using the same sequence for the remainder of the flight, so is actually difficut to determine the amount of battery that remains.
The controller can be configured using the ATLAS assistant and the provided USB cable. I could not change some of settings initially, until i upgraded the firmware from a version 1.1 to a version 1.7.
If you are using Windows 10, your com ports will not be available. Windows will detect and install the CP210x driver and it will show up under device manager.
but the Atlas assistant will not detect or see the com port. To fix this right click on the ATLAS_Assistant file choose properties
go into the compatability section
Tick the run as windows 8 box apply and save. and run the program.
After reading the forums, you can also just tick the Run as administrator box save and run.
Windows 10 blocks unistalled programs from accessing the com port. Seeing as this is downloaded, it has to be run as an administrator.
This also applies for the firmware update file.
The IMU calibration and the MAG calibration can be done on the fly when not connected to the assistant using the radio. There is a telemetry port provided on the board to connect to a ground station.
Flight characteristics: Altitude mode works pretty well even in windy conditions, very stable, the GPS mode seems to work ok but am experiencing a few problems. When activated it initially works but a gust of wind makes the quad start toilet bowling and the circle radius increases for every circle.
Stabilize mode works like a charm and the IOC mode seems ok. The quad was very sluggish on the maiden flight, direction changes seemed very slow, the reaction time was often causing unwanted situations. I changed the Trim step on the Taranus Frsky to very fine and this made the big difference, the quad felt more tuned in. Ascending is very slow, compared to the KK2. Full throttle on atlas is a controlled slow climb, whereas the KK2 really pulls some power and is more fun.
Verdict: Small and light, leaving you with a neat installation. Expensive compared to the KK2, the KK2 flies and feels more responsive when tuned in, but it does not provide the GPS, IOC and altitude-hold mode the Atlas has. The KK2 is more fun to fly whilst the Atlas gives you the opportunity of more stable FPV control and installation is pretty slick on the Atlas. Never flown the DJI naza but if you are not willing to pay the steep price, well this is actually a good alternative.
I have now been flying this bird for some time and i must say, it is kind of growing on me. One of the best things about this FC is its simplicity, i have had minimal break downs and maximum flight time. Even flying it in stabilize mode, it is easy to find and pinpoint the hover position without using the altitude hold function. Stabilize mode is much smoother than on my kk2 and direction change much slower. Makes this board much easier to control and gives you a better learning platform. I noticed a small bug, when i activate GPS mode after the first launch i have to keep my finger on the switch as the result is not always as wished. The quad instead of finding its position and hovering tends to rev up and turn away at a 45 degree angle and fly away. If i deactivate the GPS mode it goes back to its original hover. If i land the quad, disarm and rearm the GPS mode works properly. I don´t know if it has something to do with the GPS signal not been bound prior to takeoff. This is a pure FPV controller.


